A bedroom closet remodel costs $100 to $10,000 depending on whether you install wire shelving yourself or hire a custom system, and most of that range sits between DIY kits and semi-custom modular builds that land around $500 to $2,500.
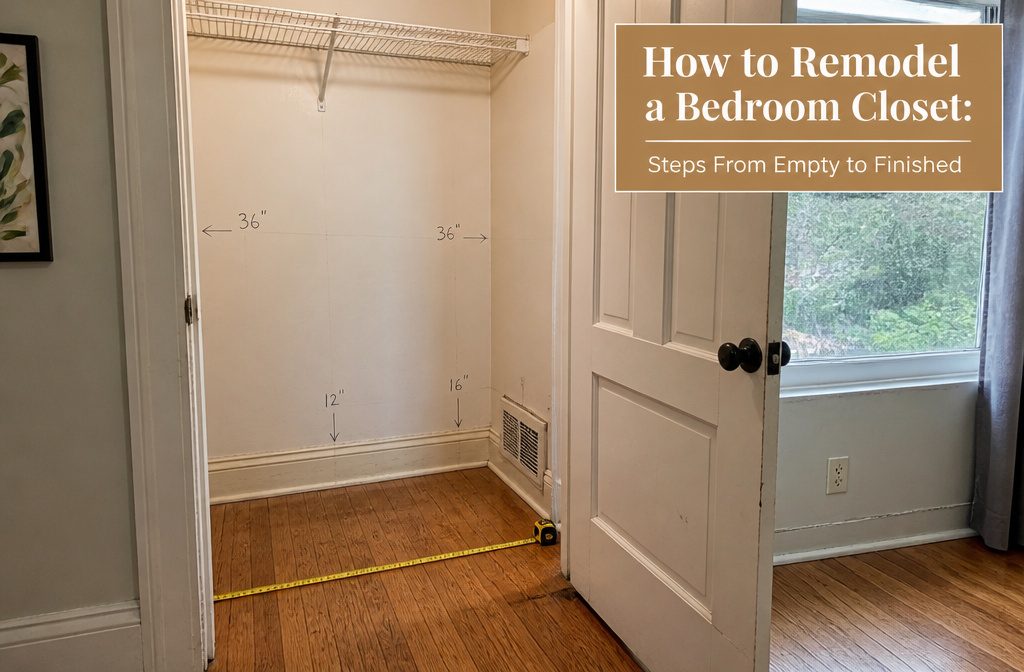
The stage that decides whether the layout works is the measurement step: mapping obstacles like door swings and HVAC vents before you order anything, because a drawer that blocks the door or a rod placed over a vent becomes obvious only after installation, when fixing it means tearing the system back out.
1. Empty the Closet and Sort What Stays
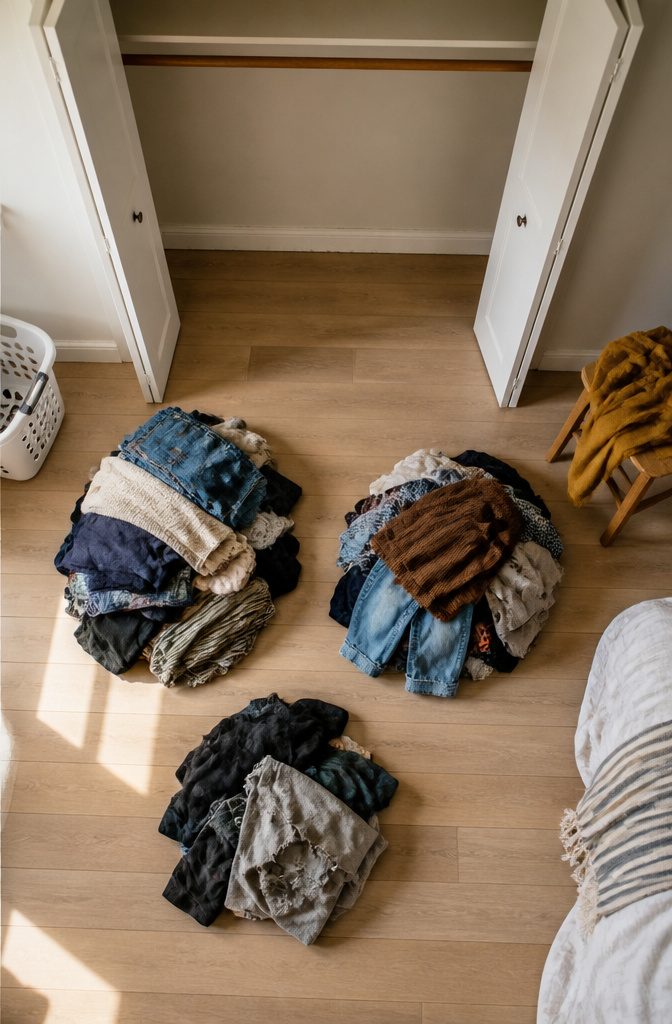
- Pull everything out and make three piles: keep, donate, and trash. The keep pile is for clothes you actually wear. Donate what still has life but does not fit your routine. Trash anything too damaged to pass along.
- Ask four questions as you sort. Does it still fit? Does it match how you dress now? Is it faded or damaged? Have you worn it in the last year? A no to any of those sends it out of the keep pile.
- Group what stays by type once the closet is empty. Put all hanging items together, stack folded shirts by color or size, collect accessories in bins. This sizing step shows you how much rod length, shelf depth, and drawer space the layout needs to handle before you start planning where any of it goes.
- Find temporary homes for keepers while the remodel happens. Hang clothes in another closet or lay them flat on plastic canvas. Keep smaller stacks organized so you can grab what you need without tearing through everything mid-project.
2. Clean the Walls and Floor While the Space Is Empty
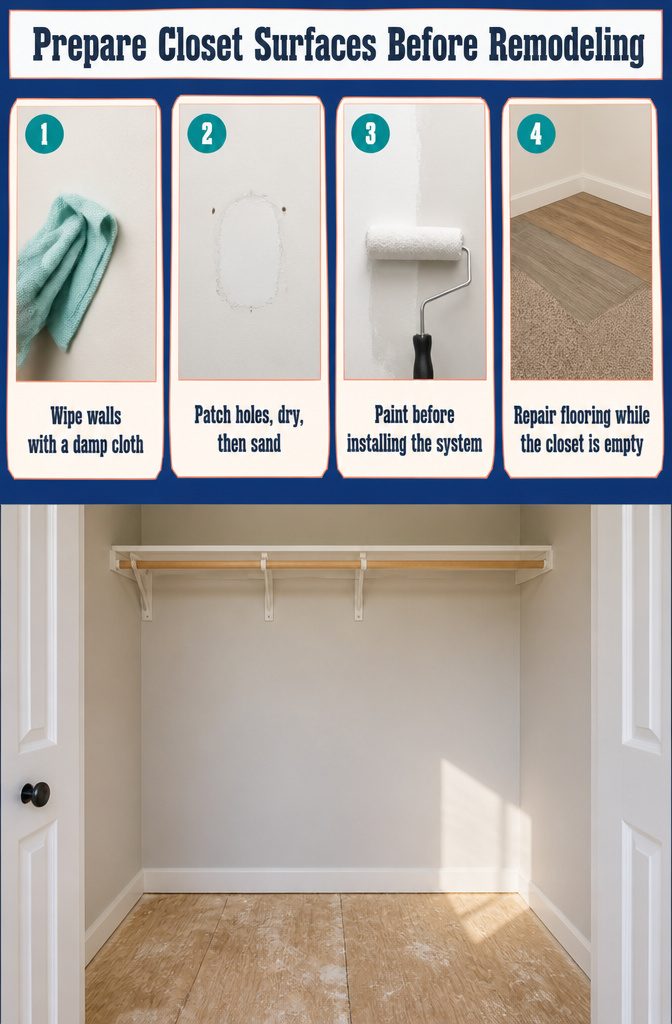
- Wipe down walls and let them dry completely before painting or papering — dust and grime prevent paint from adhering properly. A damp cloth is enough for most surfaces.
- Repair any damage: patch screw holes with spackle, let dry, and sand smooth. If the previous rod left larger holes, fill them before you move on.
- Apply paint while the space is still empty. White, off-white, and light gray are the standard choices because they read clean under closet lighting and stay out of the way once the system goes in. Roll on one coat if most of the wall will sit behind shelving; two coats if more wall shows. Smooth plywood panels for the system itself can be painted flat on the floor before assembly.
- Install or repair flooring now if it needs work. Hardwood, luxury vinyl plank, and low-pile carpet all work; choose whichever matches the bedroom or can take the wear. Tile and sealed concrete handle moisture better if that matters in your climate.
3. Measure the Closet and Map Obstacles
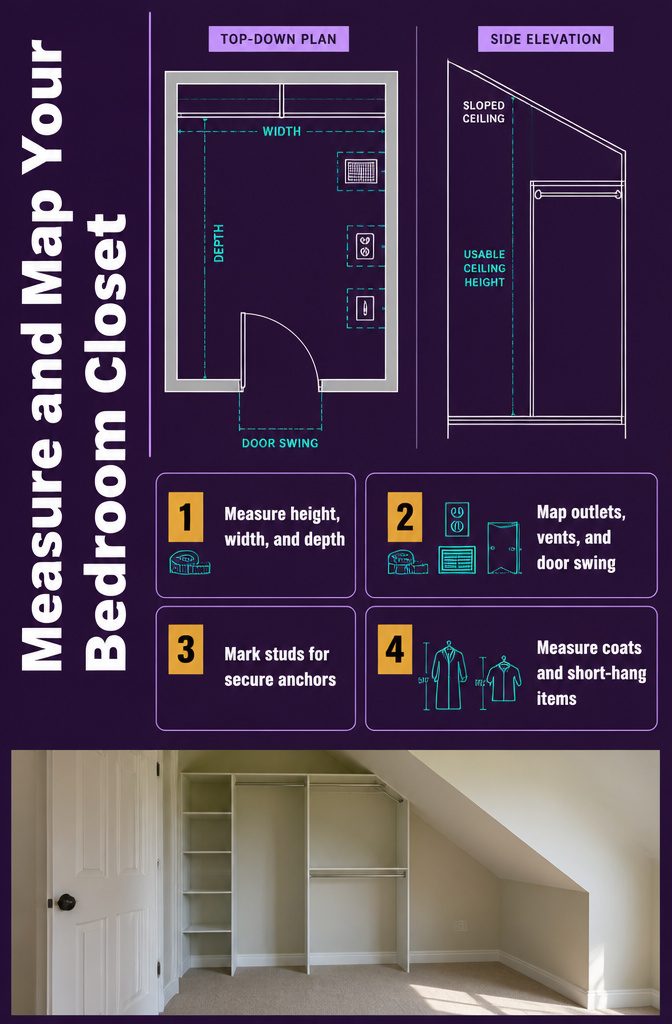
- Measure height, width, and depth at multiple points — ceilings are rarely level and walls are never perfectly straight. Record each wall separately, and if you have a sloped ceiling in an attic bedroom or under a staircase, note where the height drops and mark the usable ceiling height in that zone.
- Map every obstacle: outlets, light switches, HVAC vents, door frames, and the door swing itself. A drawer that blocks the swing or a rod placed over a vent becomes obvious only after installation, when fixing it means tearing things back out.
- Use a stud finder to mark stud locations — shelving brackets and vertical panels must anchor into studs, especially when holding heavy shoe collections or stacked bins.
- Measure your hanging piles and folded-item stacks now, while they are sorted. A coat is 50 inches long; short-hang items like folded shirts on a rod sit around 38 inches. Knowing what you actually own keeps you from designing storage for someone else’s wardrobe.
4. Set a Budget and Pick a System Route
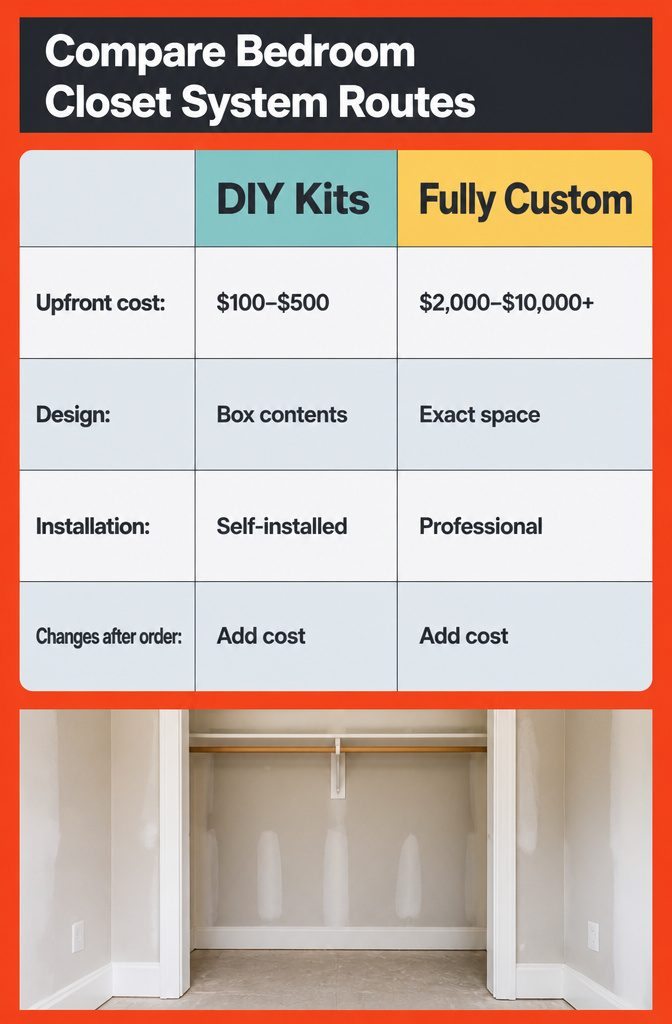
The choice splits four ways. DIY kits from the home center — wire or basic laminate shelving — run $100 to $500, install with a drill and a level, and give you what fits in the box.
Semi-custom modular systems like IKEA PAX or Elfa land between $500 and $2,500. You pick components from a set menu, they arrive flat-packed, and you assemble them yourself or hire someone to do it.
Semi-custom options typically range from $1,000–$3,000 and provide a good middle ground for many homeowners.
That middle tier gets you closer to custom dimensions without the custom price.
Fully custom systems — designed to your exact space, professionally installed in a day — start around $2,000 for a reach-in and climb past $10,000 for a large walk-in with premium materials and accessories.
The cost gap between DIY and custom narrows when you count your own labor hours, but the upfront difference still decides most projects.
One last thing: changes after you order add cost and delay, so get the design right before you confirm it.
5. Design the Layout Around What You Will Store
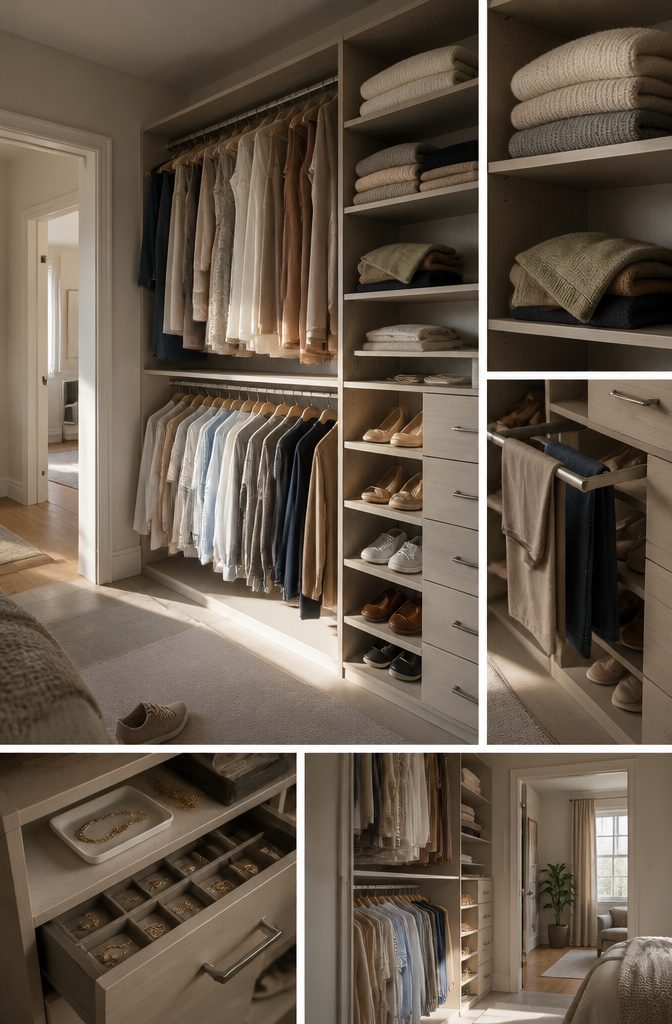
I sorted my clothes into tall hangers and short hangers first, then measured each pile to know how much rod length I needed for dresses versus shirts.
The tall stack ran about 60 inches; the short ones landed around 40. That told me I could split one wall into upper and lower rods and double the hanging capacity without losing anything to wasted vertical space.
Folded sweaters went into 10-inch stacks, and I gave each stack 14 inches of shelf.
Shoes needed their own plan—angled shelves fit 30 to 50 percent more pairs than flat ones, and I liked seeing what I owned instead of digging through a pile on the floor.
I added a pull-out valet rod for planning outfits and velvet-lined jewelry drawers so necklaces stayed untangled.
Check door width before ordering anything.
Assembled units have to pass through the bedroom door and down the hall, and a system that fits the closet but not the doorway sits in pieces in the living room until you take it apart and start over.
6. Install the System and Anchor Components
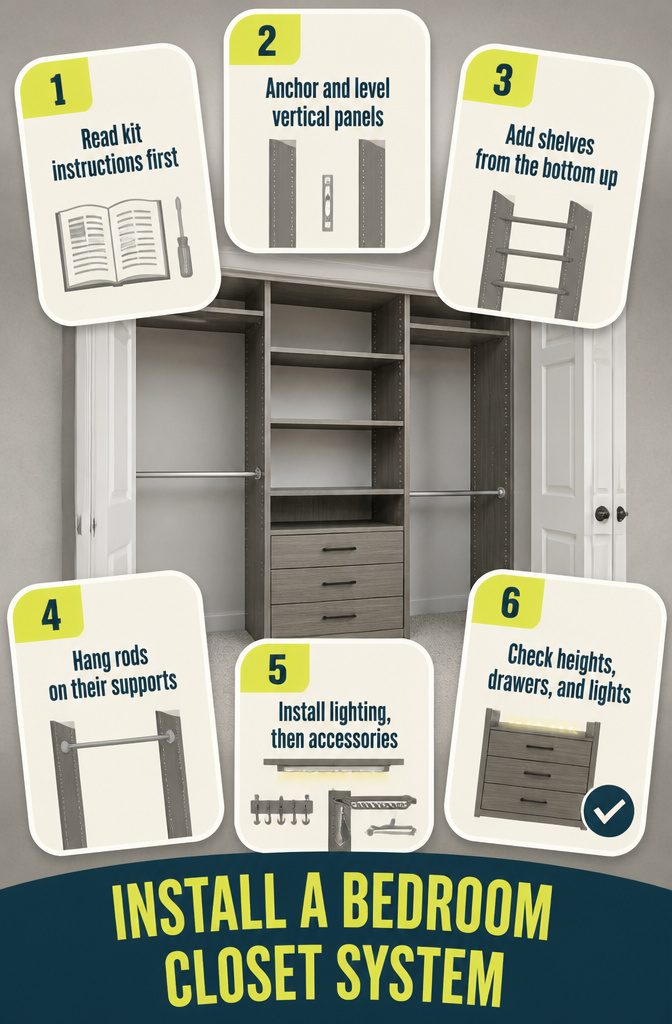
Read the kit instructions fully before you touch a single screw.
Most kits require wall anchoring at specific stud locations, and getting that wrong early creates problems that are difficult to fix once components are stacked on top of each other.
- Install vertical divider panels first. These are the structural backbone and must be anchored to studs or secured with toggle bolts in drywall. Level each panel carefully because all shelves and rods reference these verticals.
- Add horizontal shelves next. Use shelf pins, cleats, or bracket supports as directed by the kit. Work from the bottom up.
- Hang closet rods on rod sockets attached to vertical panels or side walls.
- Install lighting. LED strip lighting under each shelf tier provides even illumination throughout the closet. Battery-powered LED puck lights install with adhesive backing in minutes. For walk-in closets, add a central flush-mount LED fixture (at least 1,500 lumens for a 50-square-foot space). A color rendering index (CRI) of 90 or above ensures garment colors appear accurate.
- Add accessories. Hooks on the back of the door, pull-out tie and belt racks, and valet rods for outfit planning go in last.
- Run a final check. Confirm shelf heights match what you specified, drawers open and close smoothly, and lighting functions before calling the job done.
7. Return Belongings by Category and Adjust
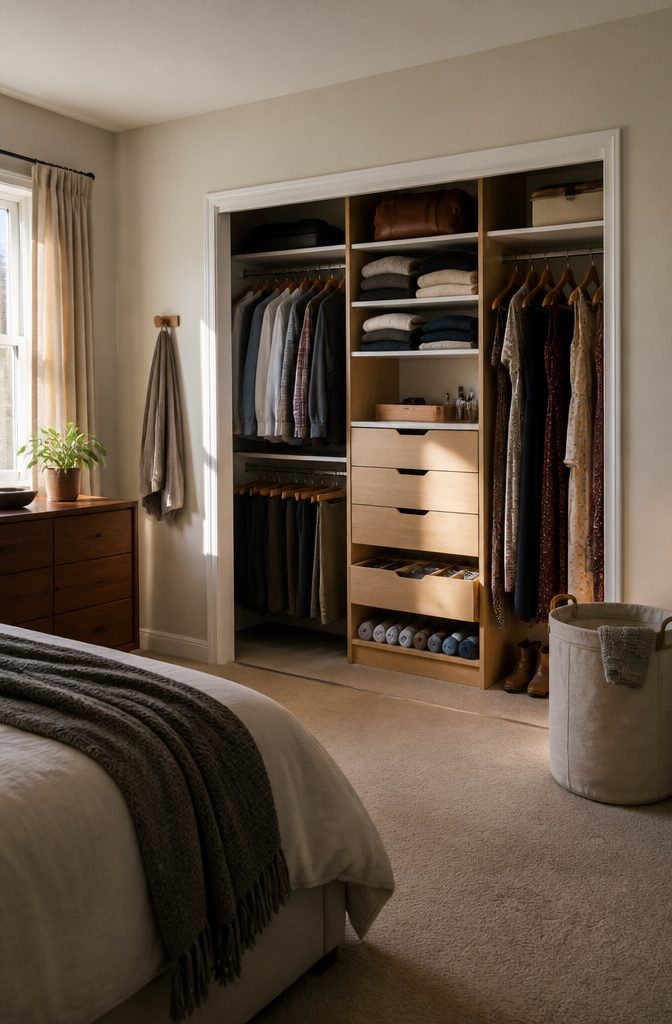
Return Belongings by Category and Adjust
- Group like items together before you put anything back. Shirts with shirts, dresses with dresses, folded sweaters on their own shelf. A system that gets loaded haphazardly on day one tends to stay that way.
- Place daily items at eye level. For a reach-in closet, put the things you always use in the center and seldom-used items on high shelves or to the sides.
- Separate long-hanging pieces from short ones. If you have mostly short items, install two levels of hanging rods to use the space efficiently.
- Use the storage you designed for the purpose you designed it for. Drawers of different sizes and adjustable shelving hold folded items; add dividers for belts and rolled-up socks.
- Note problems early. If a shelf sits too high or a drawer section landed in the wrong spot, adjust it now. Adjustable shelf pins can be moved. Larger changes are easier to address before the closet is fully loaded.
Use Vertical Space and Add Double Rods
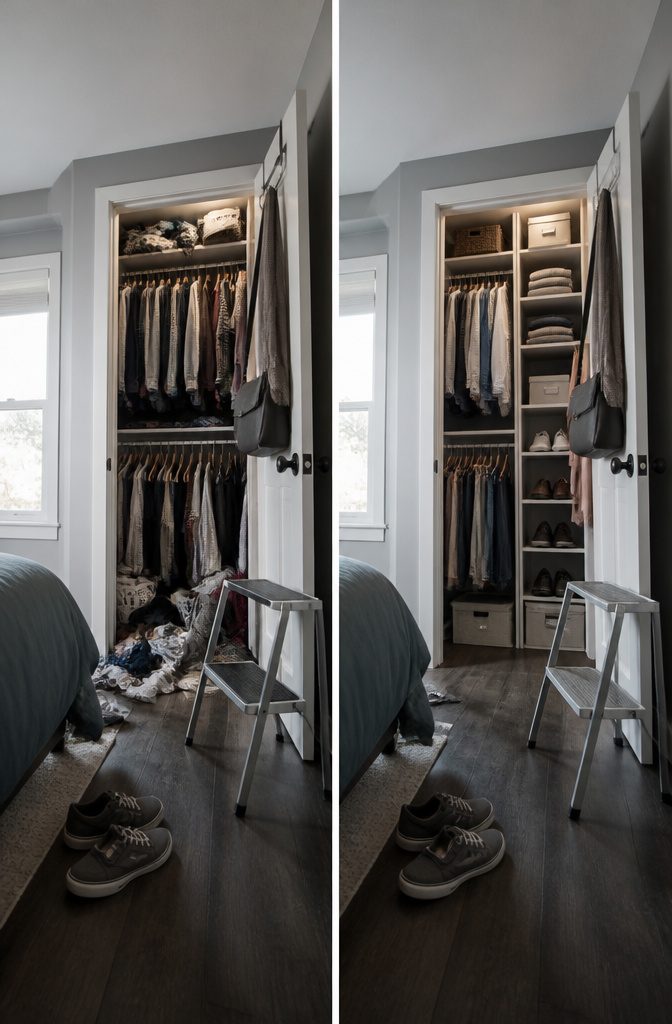
Most bedroom closets leave half their height unused.
Double-hanging rods stack two levels of shorter clothes where one long rod used to sit, and since most wardrobes run 60 to 70 percent shirts, blouses, and folded pants, that second rod doubles usable hanging space without gaining a single square foot of floor.
- Mount the upper rod at 80 inches from the floor and the lower rod 40 inches below it. Leave clearance between levels so clothes hang without touching.
- Reserve one zone for full-length hanging if you have dresses, coats, or robes that need 60 to 70 inches of drop.
- Space adjustable shelves 10 to 12 inches apart for folded clothing, 14 to 16 inches for bins and shoe boxes. Adjustable pins let you reconfigure as the wardrobe changes.
- Add hooks to empty wall space or the back of the door for bags, scarves, and hats, or use an over-the-door organizer with pockets for smaller accessories.
- Keep a step stool nearby so high shelves stay in rotation rather than turning into dead storage you never touch.
Paint, Lighting, and Finishing Choices
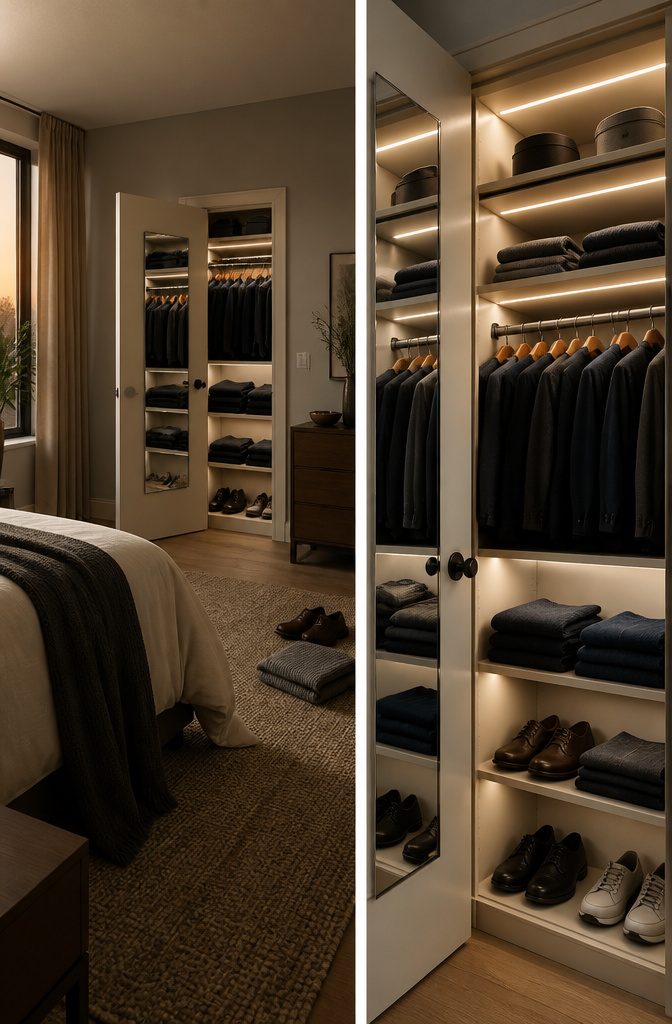
Lighting decides whether the closet reads as finished or still looks like a storage box with clothes in it.
Most builder-grade closets have a single overhead bulb or no fixture at all, which makes it impossible to distinguish navy from black or match outfit colors before you leave the house.
LED strip lighting under each shelf tier gives even illumination throughout the closet without harsh shadows.
Battery-powered LED puck lights install with adhesive backing in minutes and need no wiring. For walk-in closets, a flush-mount LED fixture rated at least 1,500 lumens for a 50-square-foot space works as the central light, then add under-shelf strips for detail.
Motion-sensor switches activate lights when you open the door and prevent them from being left on. A color rendering index (CRI) of 90 or above keeps garment colors accurate under artificial light.
Paint the walls before the system goes in. White, off-white, and light gray all work as clean backgrounds.
Darker colors can compress a small closet but work in larger spaces with good lighting. Wallpaper is an option if you want pattern on a ceiling or back wall.
A full-length mirror on the back of a reach-in closet door or on an empty walk-in wall gives you room to step back and see the outfit head to toe.
What Closet Remodel Costs Depend On
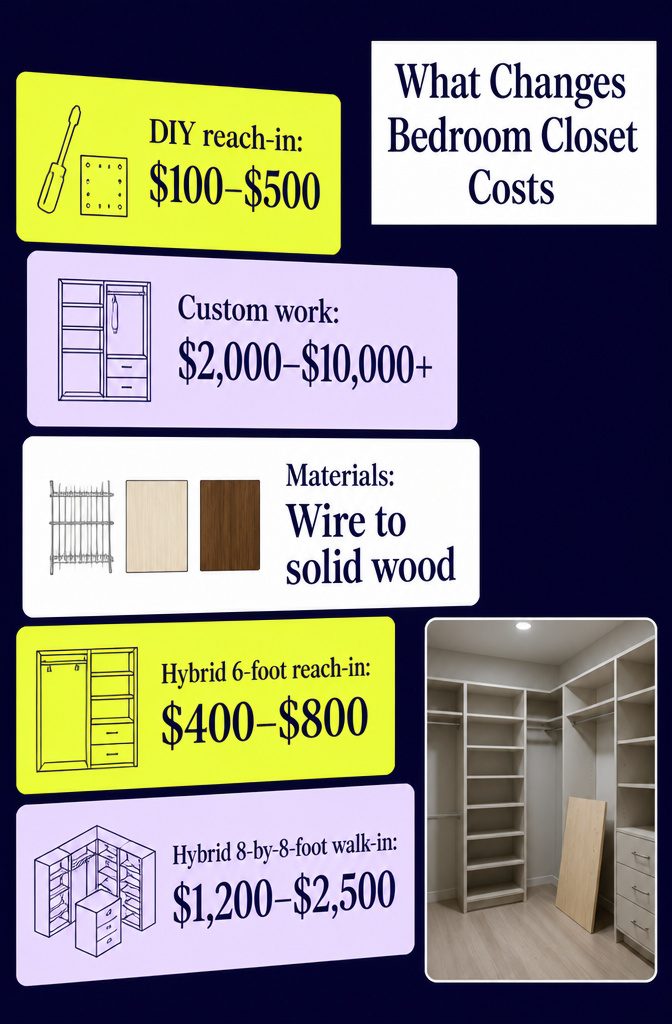
Cost depends on closet size, the system you choose, the materials, and whether you install it yourself or hire someone.
A DIY modular system for a small reach-in runs $100 to $500. Semi-custom systems with professional installation cost $500 to $2,500 for a reach-in and climb to $4,000 for a larger walk-in.
Fully custom work from a specialty closet company starts around $2,000 and can push past $10,000 for a primary walk-in with premium finishes and accessories like islands or LED lighting.
Material choice moves the price too: wire and laminate sit at the low end, wood veneer in the middle, solid wood at the top.
A hybrid approach keeps cost down without sacrificing much function. Buy modular melamine components, add custom-cut plywood where dimensions don’t fit standard sizes, and spend on better hardware.
That runs $400 to $800 for a 6-foot reach-in or $1,200 to $2,500 for an 8-by-8-foot walk-in, and the result looks professionally installed at a fraction of the custom price.
Frequently Asked Questions
What’s the average cost to redo a closet?
A DIY modular system for a reach-in closet runs $100 to $500, while semi-custom options with professional installation cost $500 to $2,500.
Fully custom walk-in closets start around $2,000 and can exceed $10,000 with premium finishes and accessories. Material choice affects price too: wire and laminate sit at the low end, wood veneer in the middle, and solid wood at the top.
How do I redo my closet on a budget?
Buy modular melamine components, add custom-cut plywood where standard sizes don’t fit, and spend on better hardware.
This approach runs $400 to $800 for a 6-foot reach-in or $1,200 to $2,500 for an 8-by-8-foot walk-in, delivering a professionally installed look at a fraction of custom pricing.
Do it yourself closet remodel?
A DIY closet remodel takes 1 to 2 days for a reach-in and 2 to 3 days for a walk-in using modular systems.
You’ll need to measure carefully, anchor components to studs, and install shelves, rods, and lighting yourself. Read kit instructions fully before starting, since getting wall anchoring wrong early creates problems that are difficult to fix later.
How long does a closet remodel take?
DIY projects take 1 to 2 days for reach-in closets and 2 to 3 days for walk-ins.
Professional custom installations require 1 to 2 days of on-site work plus 2 to 4 weeks of lead time for design, measurement, and fabrication. Add one day if you’re painting the closet interior before installation begins.
Do I need a permit to remodel a closet?
Installing shelving, rods, lighting, and doing cosmetic work generally do not require permits. Electrical changes, removing or moving walls, or changing the room’s use may require permits depending on local building codes.
Can I turn a small bedroom into a walk-in closet?
Yes, converting an adjacent bedroom into a walk-in closet costs $3,000 to $8,000 including doorway work, closet systems on three walls, lighting, and finishes.
This conversion reduces your home’s official bedroom count, which can affect resale value, so weigh that tradeoff before proceeding.
What is the best closet system for renters?
Freestanding or tension-rod systems work best for renters because they can be removed without permanent wall changes. These systems avoid drilling into studs or leaving anchor holes that require repair when you move out.
How do I prevent musty odors in a remodeled closet?
Keep the closet door open or install a louvered vent to allow air circulation. Add odor-absorbing products or a small dehumidifier if moisture is a recurring problem in your climate.
What remodeling options will help me keep my clothes off the closet floor for good?
A built-in laundry hamper gives dirty clothes a designated spot, removing the decision of where they go. Extra hanging rods and a wardrobe lift handle overflow that would otherwise end up draped over furniture or dropped on the floor.