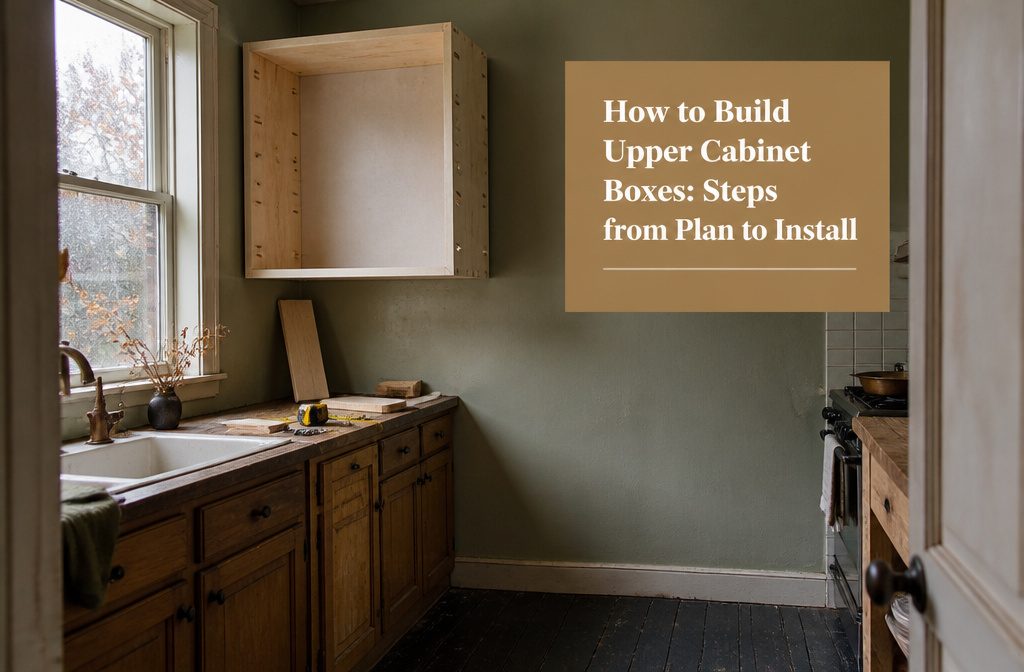
A 30-inch upper cabinet box takes six boards, pocket screws or dados, and roughly two hours if you’ve cut square parts and prepared the joinery first.
Most builders lose square during assembly, when glue is setting and there’s no time left to recut.
The back panel is what locks it in: measure corner to corner in both directions before you fasten it, and if the diagonals don’t match within 1/16 inch, the doors will bind no matter how carefully you hang them.
1. Plan the Box and Choose the Construction Style
I start by measuring the actual space.
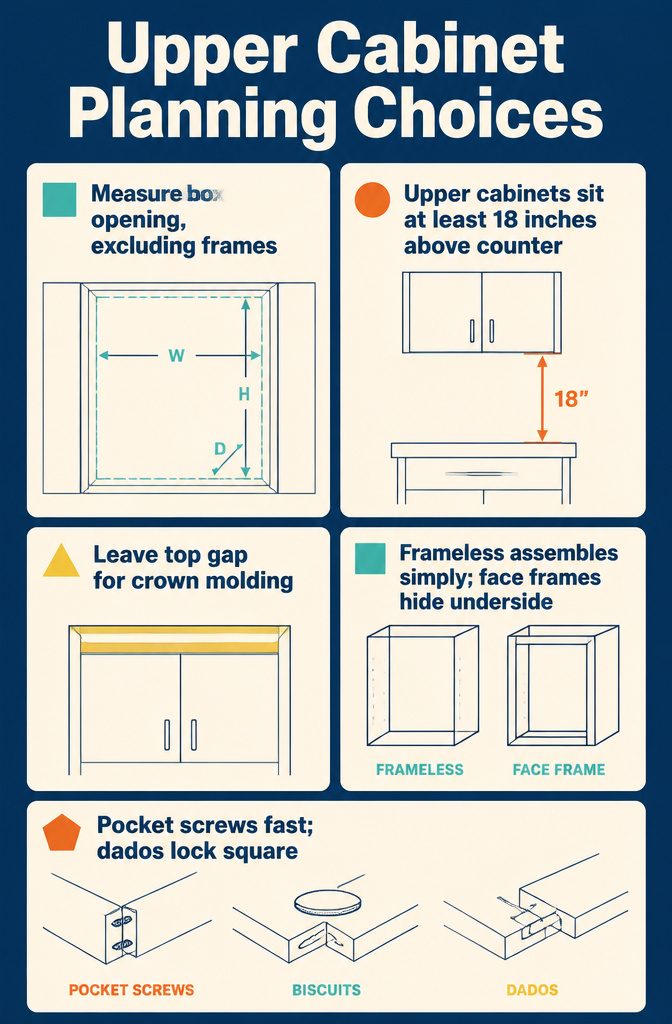
The depth of the existing cabinets matters, but I exclude the face frame thickness when I take that measurement. Same goes for width: I measure the box opening, not the total including frames or filler.
The height tells me how much room sits between the countertop and the ceiling, and I leave a small gap at the top for crown molding if I plan to add it later.
The space at the very top of the storage area is not terribly easy to reach. It’s not something that you can get at every day. And by leaving it open like this, it becomes kind of a display area.
That open strip at the top can work as display space rather than becoming dead storage you never actually use.
Upper cabinets should sit at least 18 inches above the countertop. A typical upper height runs around 40 inches, though that varies depending on ceiling height and how much storage you need.
Once I know the dimensions, I choose between frameless or face-frame construction. Frameless boxes simplify assembly, but face frames help hide the underside of the cabinet and give a more finished look from below.
For joinery, pocket screws work well and assemble fast. Biscuits with glue offer a cleaner interior, and dados give a mechanical lock that holds the box square during assembly.
If I go with face frames, the cut formulas shift slightly to account for that thickness. The back panel runs (W – 1.5) by H, the top and bottom pieces (W – 1.5) by (D – 1.5), and the sides (D – 3/4) by H.
2. Select Materials and Cut the Parts
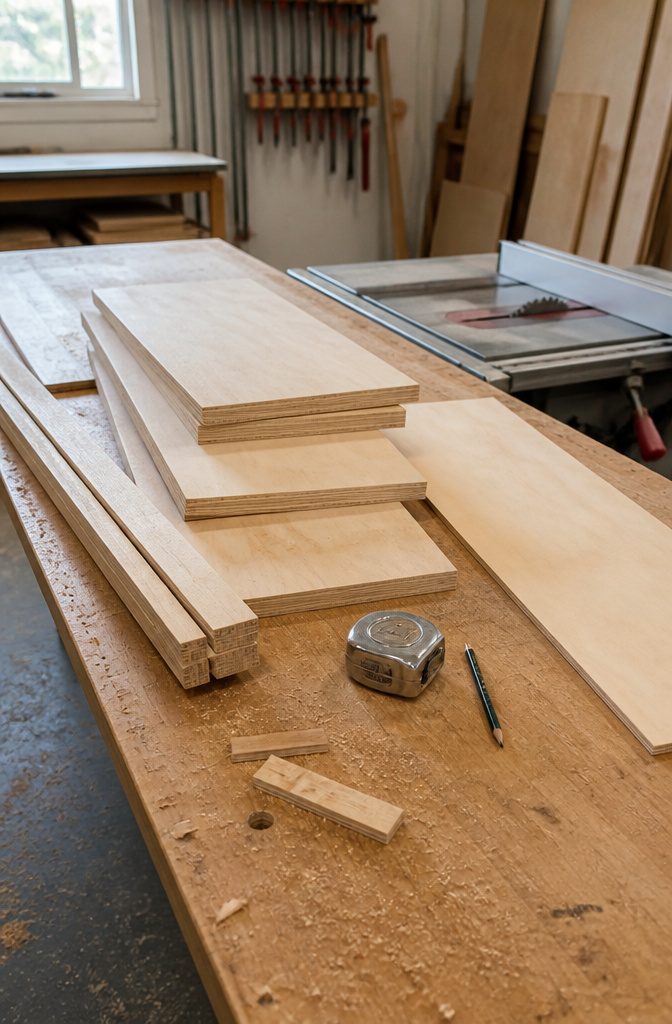
The first step after planning the box is getting 3/4-inch plywood ripped to match your cabinet depth.
If you’re extending an existing run, measure the depth of what’s already there and rip your sheet to that width. For a standalone upper cabinet, somewhere between 12 and 13 inches deep is standard.
I cut the plywood into strips at that depth, then cross-cut those strips into the individual parts: two sides, a top, a bottom, and a back panel from 1/4-inch plywood.
For a 30-inch-tall upper cabinet, the sides are cut to 30 inches. The top and bottom come from the same strip, cut to 28-9/16 inches to account for the thickness of the sides once assembled.
The top gets ripped to 10-3/4 inches wide, and if you’re adding a shelf, rip that one to 10-1/2 inches to leave clearance.
Factory edges on plywood can be rough or out of square, so I trim one end square first, mark the edge I held against the fence, then flip and cut to final length against a stop.
3. Prepare the Joinery, Back Panel, and Shelf-Pin Holes
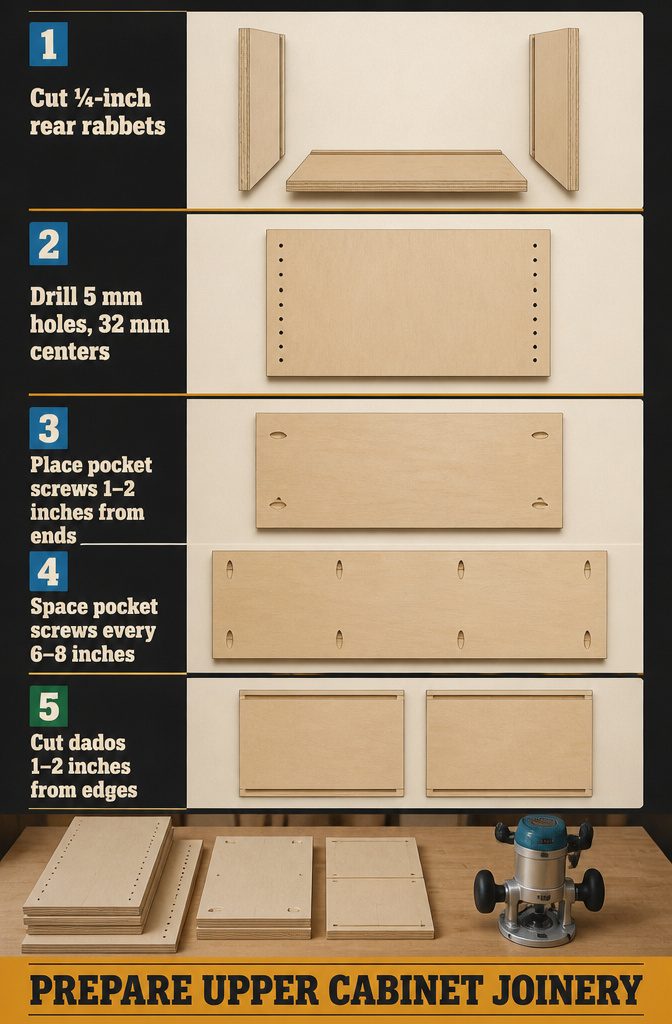
The joinery you cut now decides whether the cabinet holds square under its own weight or fights you at every step.
Rabbets for the back panel sit ¼ inch deep along the rear edges of both sides and the bottom, cut with a dado stack or a router.
The back itself drops into these rabbets flush with the outer edges, locking the box square once it’s screwed in place.
Shelf-pin holes go in before assembly, when the sides lie flat and you can drill without guessing.
Space them 5 mm in diameter, 32 mm center-to-center, in two rows running the full height of each side panel. A drilling jig keeps them straight and prevents tearout on the opposite face.
Two assembly methods split the field. Pocket screws sit 1–2 inches from each board end and then every 6–8 inches along the joint, angled through the back face where they won’t show.
Traditional dados run 1–2 inches from the top and bottom edges, cutting a groove that captures the mating board and adds glue surface. Dados hold better under weight; pocket screws assemble faster and let you skip the dado stack.
4. Assemble and Square the Carcass
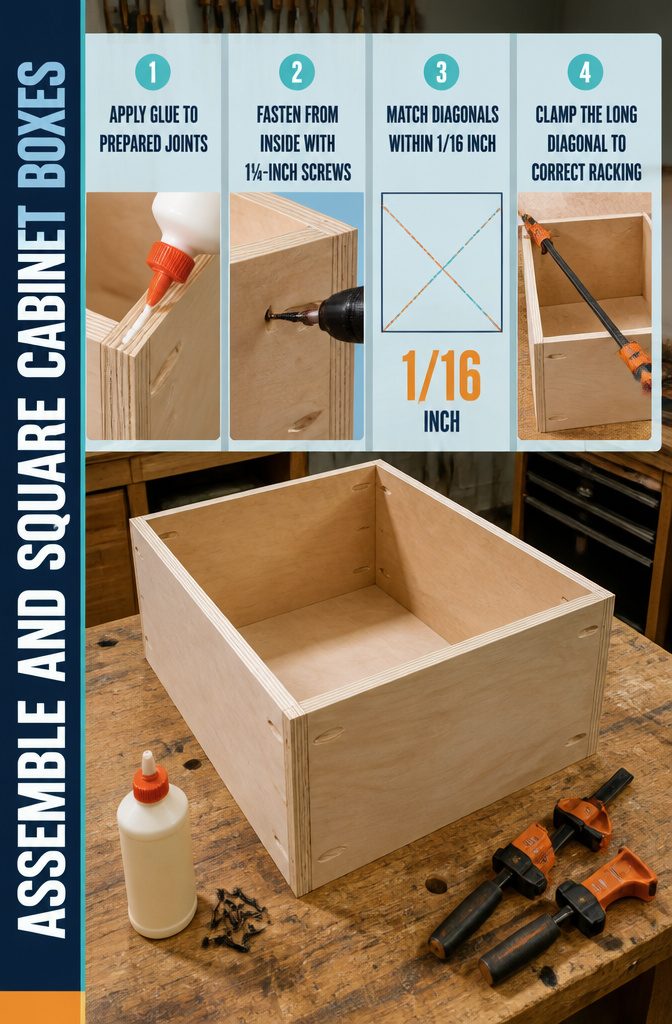
Once the joinery is prepared, the sides, top, and bottom come together in a specific sequence that matters.
I start by applying wood glue to the joints, then bring the pieces together and fasten them with either pocket-hole screws or biscuits and screws, depending on the method I chose earlier.
For pocket holes, 1-1/4-inch screws work well with 3/4-inch material, and driving them from the inside face keeps the heads hidden.
If I cut dados, the top and bottom slide into those grooves with glue, then get clamped or pinned until the glue sets.
Checking square happens immediately, before the glue starts to set. I measure corner to corner across the face of the box in both directions; if the two diagonals match within 1/16 inch, the box is square.
If they differ, I apply light clamp pressure across the long diagonal to pull the frame into square, then recheck.
Some builders attach the back panel first, then add the sides and bottom in sequence, using the back as a squaring reference. Either way, the diagonal check catches the problem while there is still time to fix it.
5. Fit the Back and Add Hanging Supports
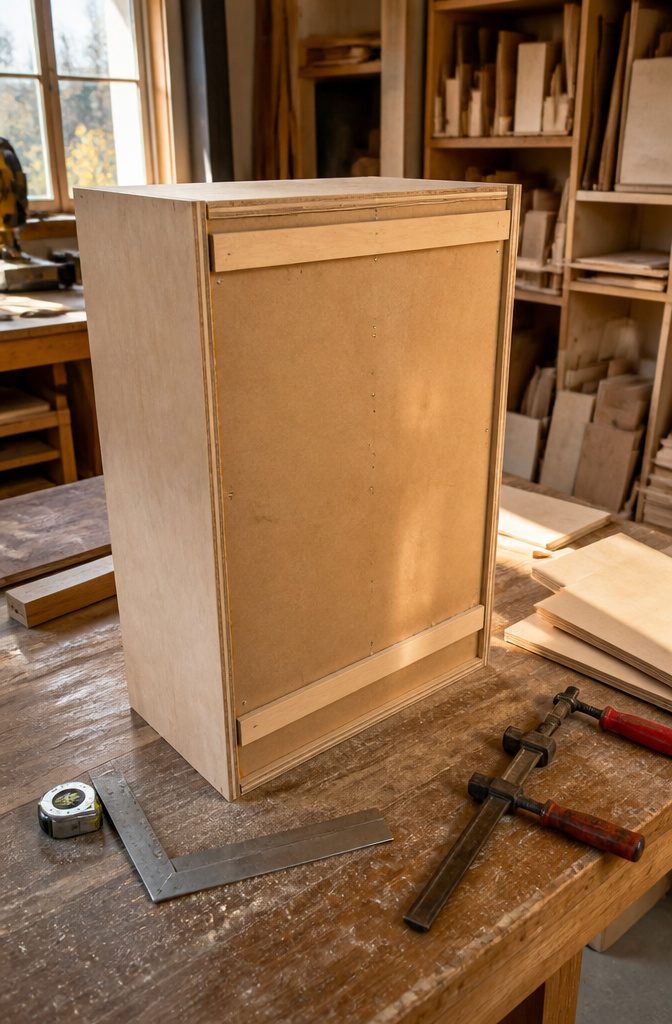
The back panel closes the box and gives you something to fasten to the wall.
Most builders set it into rabbets or grooves cut along the rear edges of the sides, top and bottom during the cutting stage, then secure it with a bead of glue and staples or screws once the carcass is clamped square.
I check diagonal measurements first — if they match, the cabinet is square and the back will lock that geometry in place. A full back means you can hit studs anywhere along its width, not just at two spots.
If you skipped rabbets, screw the back flat against the rear edges and add horizontal nailers between the sides at the top and bottom.
Those nailers — thin plywood strips — give you solid blocking to hang the cabinet from. Either way, the back goes on before the glue cures, while adjustment is still possible.
6. Add a Face Frame or Finish Exposed Edges, Then Prepare for Installation
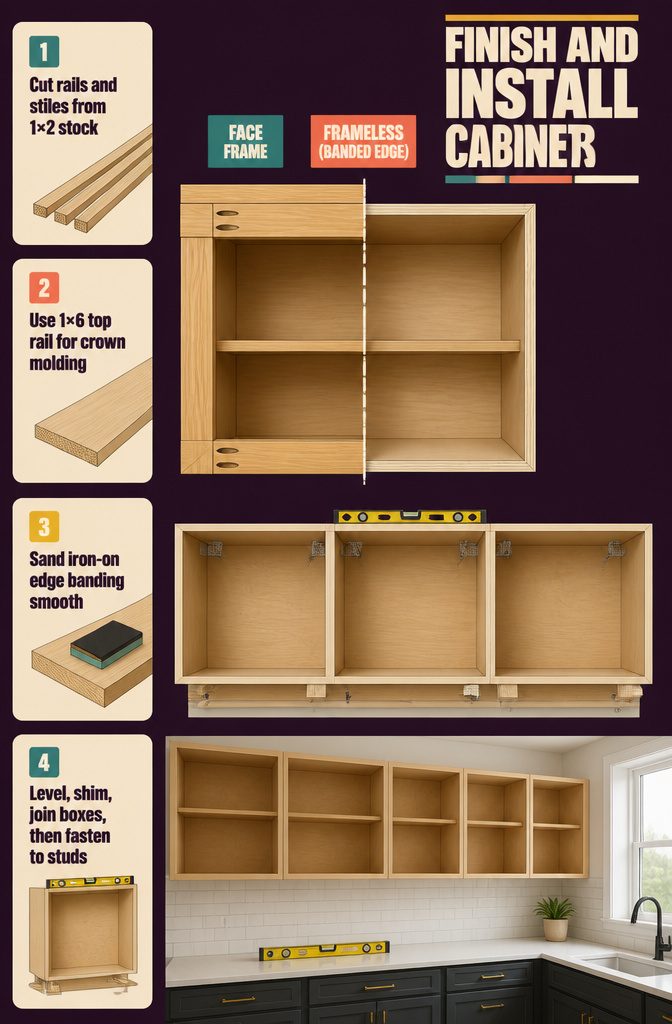
Face frames give framed boxes clean finished edges and a nailing surface for doors.
I cut 1×2 stock for the bottom rail and the vertical stiles, then a 1×6 for the top rail. The wider top board creates a mounting surface for crown molding later.
Drill pocket holes at each end of the rails, apply wood glue to the mating edges, clamp the frame together, and drive screws through the pockets into the stiles.
Line up the stiles with the ones on your existing cabinets so the grid reads as one continuous run.
Frameless boxes skip the frame and use iron-on edge banding on any exposed plywood edge instead. Sand smooth after the banding cools.
Installation starts with leveling and shimming each box until it sits true, then joining adjacent boxes to one another.
Screw through the back wall into studs, and drive one or two screws down through the bottom of the new box into the top of the cabinet below for added stability.
On walls with uneven framing or irregular stud spacing, a ledger strip screwed level to the wall and metal hanging clips offer more forgiving attachment than chasing studs.
Plywood and Box Construction Choices
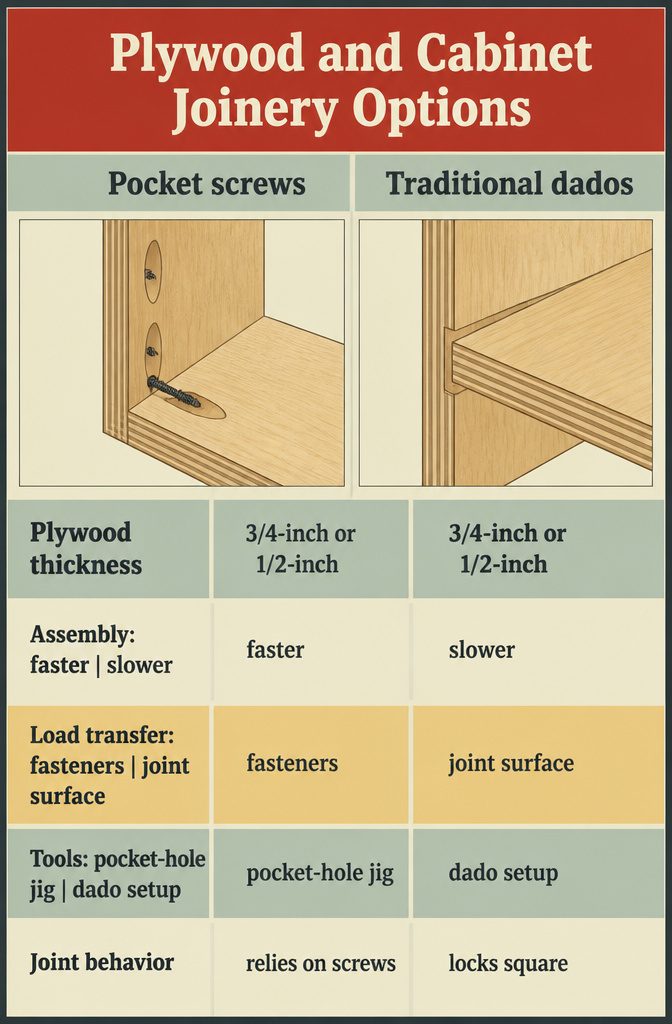
The box itself goes together with 3/4-inch plywood in most builds, though a few switch to 1/2-inch for the back panel or use it throughout to save weight.
I’ve seen both thicknesses work, and the choice usually comes down to how much load the cabinet will carry and whether you’re matching existing boxes.
Plywood never lands exactly on nominal thickness, so if you’re cutting dados or grooves, undersized router bits made for plywood save the fitting and sanding that follow a standard bit.
Joinery splits along two tracks. Pocket screws with glue make assembly fast and forgiving, and they’re the go-to for builds where speed matters or you don’t have a dado stack.
The other path is traditional dado joinery: a groove along the back edge to house the back panel, and dados at the top and bottom to capture those shelves.
The dados lock the box square and spread the load across the joint rather than concentrating it on fasteners.
You cut them on a table saw with multiple passes, tapping the fence outward after each one until the plywood slides in snug, or you run a router table with an undersized bit that matches plywood thickness in one pass.
Some builders add rabbets along the back edges instead of a dado, and a few mention biscuits as reinforcement before driving screws.
No single method wins universally. The builds I’ve read through use different combinations depending on whether the cabinet sides will show, how the back mounts, and what tools are on hand.
How the Box Is Supported or Attached
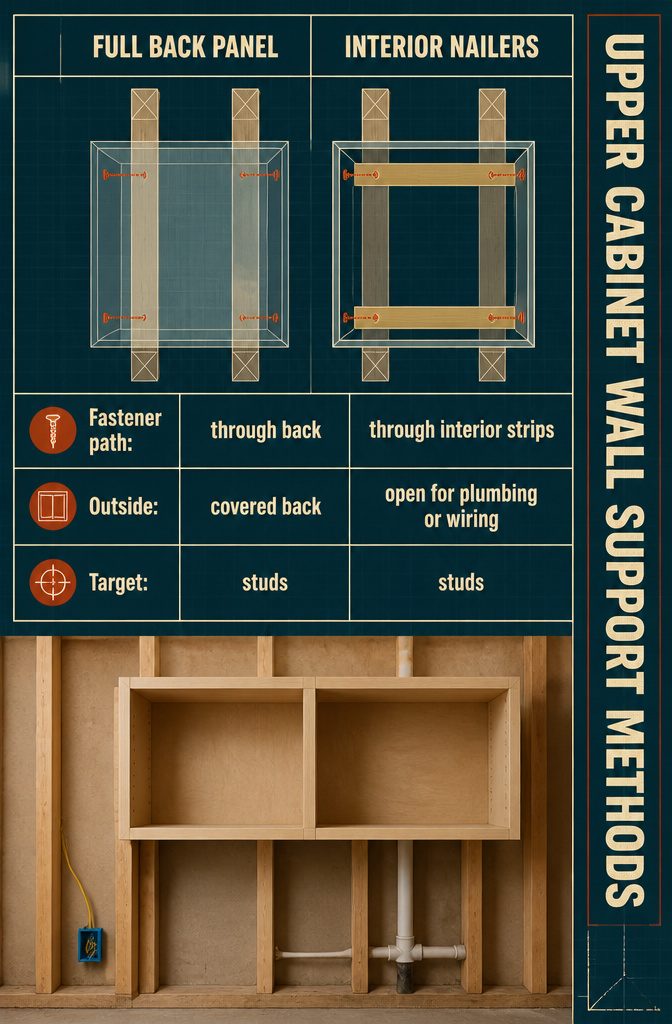
The box can hang from screws driven straight through its back panel into wall studs, or from nailers or cleats attached inside.
Each method gives secure support if you hit solid framing, and the choice matters less than getting the fasteners into studs rather than drywall alone.
A full back panel screwed to studs is the simplest approach. Drive screws through the panel into at least two studs, spaced sixteen inches apart in most framing.
If you built the box with a rear support strip instead of a full back, fasten through that strip. Either way, the box hangs from the wall’s structure rather than floating on anchors.
Nailers work the same way but sit inside the box.
Attach horizontal strips across the back, then screw through those into studs. The nailers give you a wider target for fasteners and leave the outside of the box cleaner if you left the back open for plumbing or wiring.
When you install multiple boxes side by side, screw them together through the side panels before you fix them to the wall. That ties them into one stable unit and lets you level the whole run at once.
Keeping the Box Square
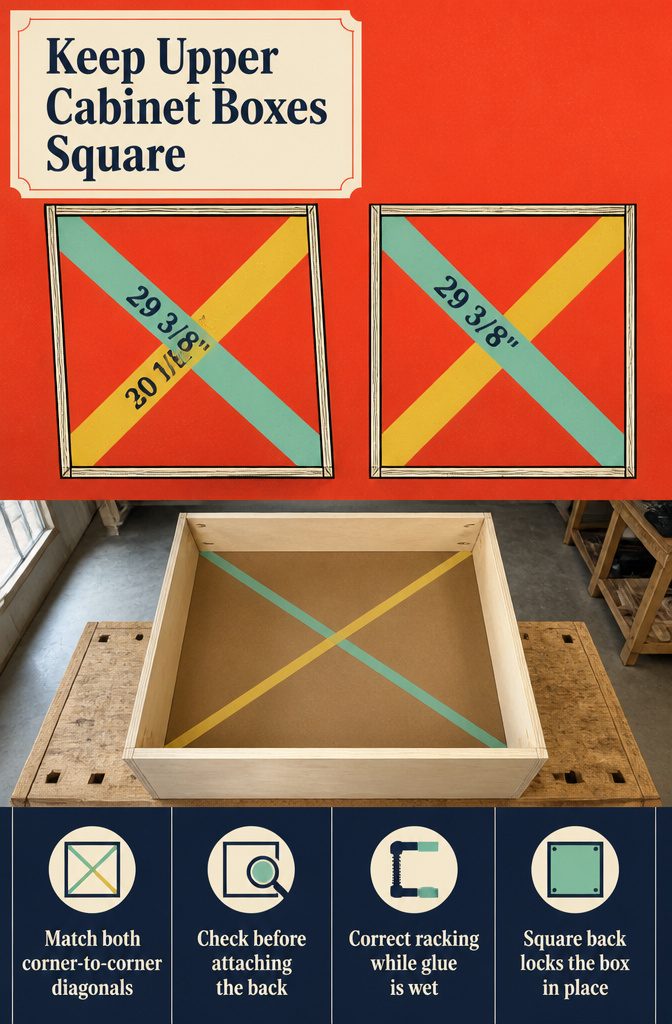
Square cuts decide whether the cabinet assembles true, and diagonal measurements tell you whether it did.
If the box is out of square when you drill the hinge holes or hang it on the wall, the doors will bind and the cabinet will fight the studs.
Most of the work happens before assembly.
Cut each panel square at the saw, and the box will want to be square when you clamp it. Once the sides are joined and before you attach the back, measure corner to corner in both directions.
The two diagonals should match. If one is longer, the box is racked, and you can nudge it square while the glue is still wet and the clamps are on.
The back panel locks everything in place.
A square back on a square box means the cabinet stays that way through transport and installation. Check the diagonals one last time as you fasten the back, because past that point adjustments are nearly impossible.
Matching Existing Cabinets and Handling Crown Molding
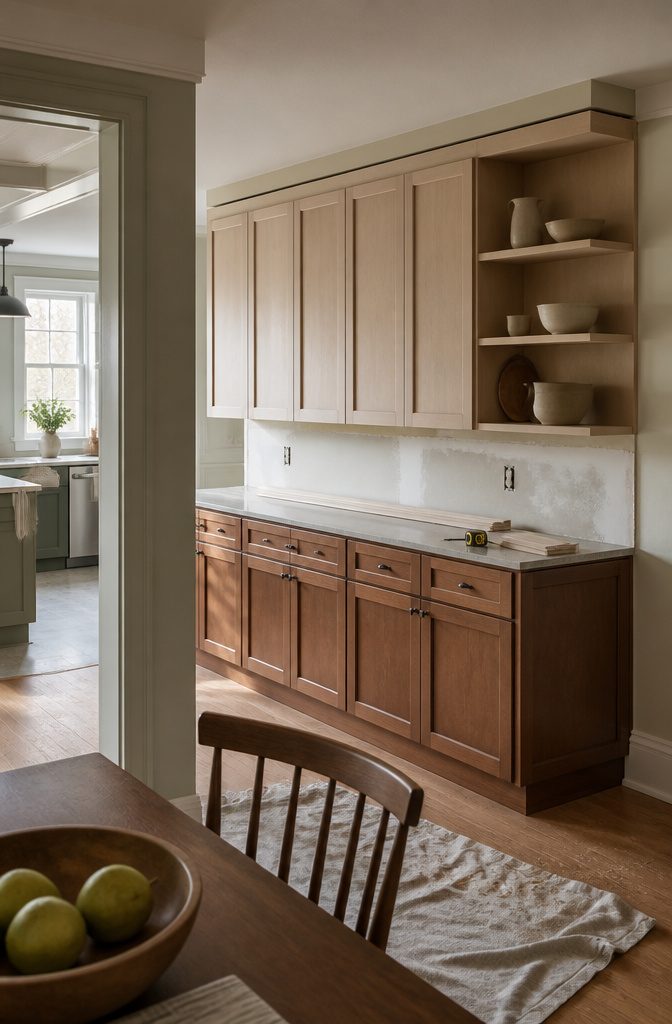
When the new boxes sit above existing cabinets rather than replacing them, the design changes.
The depth of your existing cabinet boxes becomes the starting depth for the new units, and the gap between cabinet top and ceiling sets the height you have to work with. Measure both before cutting anything.
Leave a small gap at the ceiling line for crown molding if you plan to add it. That gap matters more than you’d think: without it, the molding either floats below the ceiling or forces you into awkward scribing.
One option worth considering is leaving the uppermost section open entirely instead of boxing it off. The top shelf is hard to reach for everyday storage, but as a display area it works well.
You can set ceramics or serving pieces up there and still get two full shelves below. The open top also saves material and simplifies the build.
Whether you close it off or leave it open depends on how much you value that top row of storage against the ease of access and the look of an intentional display ledge.
When to Finish the Parts
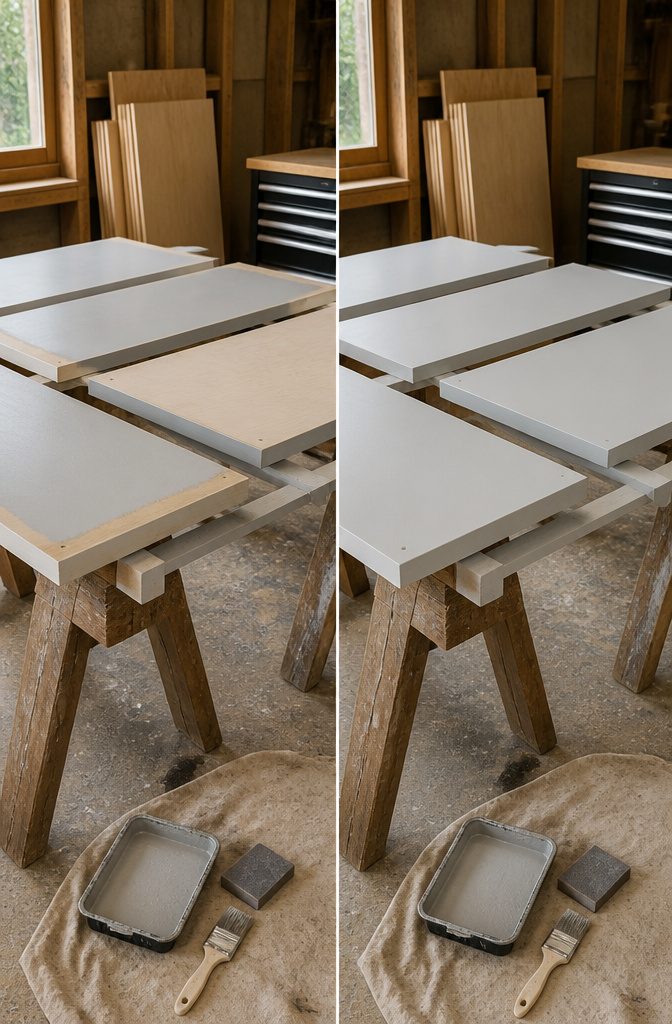
Finish what you can before the box goes together.
I sand and prime any inside surfaces that will be hard to reach once the carcass is closed up, and I apply the first coat of paint or sealer to edges that meet joints.
Getting a brush into a corner after assembly is possible but annoying, and the finish ends up uneven where the wood meets.
I’ve painted cabinets both ways.
The uppers went in with Kilz primer and two coats of Sherwin Williams Dorian Grey already dry; the base cabinets got Minwax Helmsman poly after they were hung. Painting before assembly would have been easier on the base units too.
Once the box is together and mounted, you’re working around brackets and trying not to drip on the floor, and sections you thought you could reach turn out to be just past your wrist angle.
If I were building another set, I’d paint or poly the parts flat on sawhorses, then assemble.
Frequently Asked Questions
What size plywood should I use for cabinet boxes?
Use 3/4-inch plywood for the sides, top, and bottom of upper cabinet boxes.
A 1/4-inch panel works for the back. Sanded plywood in maple, birch, or oak gives a clean interior, though any quality plywood will work as long as you match the thickness across all structural parts.
How to add boxes above cabinets?
Measure the depth of your existing cabinets first, then build new boxes to match that depth.
Position the new boxes on top of the old ones, screw through the back panel into wall studs, and drive one or two screws down through the bottom of the new box into the top of the cabinet below.
Leave a small gap at the ceiling for crown molding if you plan to add it.
Is it cheaper to build or buy a cabinet?
Building your own cabinets costs less in materials than buying pre-made boxes, especially if you already own a table saw and drill.
Building cabinets costs less in materials but demands several days for cutting, assembling, and finishing the boxes. If you value the customization and don’t mind the labor, building saves money.
What is the 1/3 rule for cabinets?
Upper cabinets should sit at least 18 inches above the countertop.
A typical upper cabinet runs around 40 inches tall, though that varies with ceiling height and storage needs. The space between counter and ceiling determines how much room you have to work with when planning box height.